5.1 简单轮子:VueTab 组件
大纲链接 §
[toc]
需求分析
用户用例
- 默认选中第一项 可选择特定页
- 可切换
- 可被禁用、被隐藏
- 可添加icon
- 横向Tab 默认
- 竖向Tab
- 上下箭头 选择/查看更多
- 提供 可选的 右侧附带按钮
- 卡片式页签,即样式与Tab内容视觉一体化
- 可添加、删除Tab页
- Tab页切换动画
- 移动端
- 可滑动切换Tab页
- 置底菜单式Tab页
- 可做路由切换
参考业界,不增加用户学习成本
- antDesign
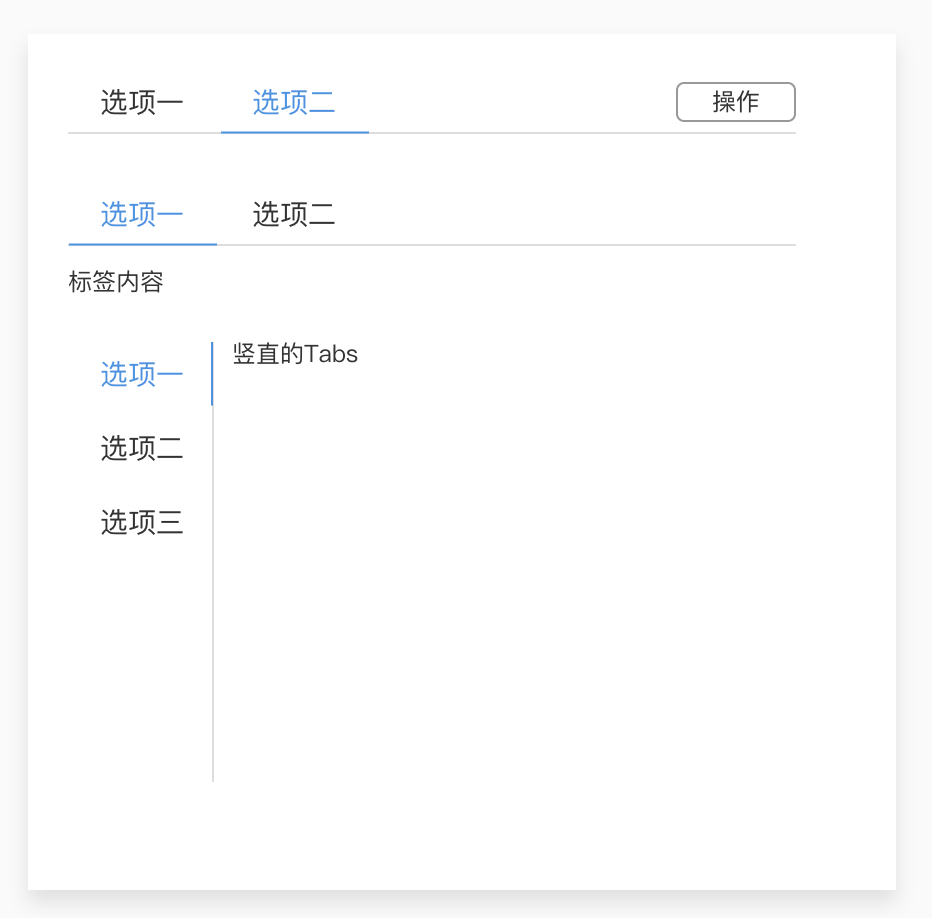
使用演示示例
|
|
API设计
创建五个组件 + 展示组件
VueTab:<v-tab></v-tab>VueTabNav:<v-tab-nav></v-tab-nav>VueTabItem:<v-tab-item></v-tab-item>VueTabContent:<v-tab-content></v-tab-content>VueTabPane:<v-tab-pane></v-tab-pane>Tabs:<Tabs></Tabs>
以
VueTab.vue为示例
|
|
- 其他组件结构类似,之后具体写出
展示组件
Tabs.vue
|
|
- 保证子组件时不能修改父组件任何的值
- 改变一个
tab不能直接在子组件中改 - 必须通知父组件,让父组件去改
- 改变一个
<VueTab :slelected="selectedTab" @xxx="selectedTab=$event">中触发自定义事件@xxx时执行代码selectedTab=$event- 绑定数据
:slelected="selectedTab" - 其中
@xxx一般取名为@update:selected - 依据需要改变的数据名
selected加上前缀@update:
- 绑定数据
- 以上可以使用
vue2.6+的语法糖.sync来简写<VueTab :slelected.sync="selectedTab">
- 即以下两种写法完全等价
<VueTab :selected.sync="selectedTab"></VueTab><VueTab :selected="selectedTab" @updated:selected="selectedTab=$event"></VueTab>
初步实现VueTab
需要传入的外部数据
selected表示选中的 tab 名direction表示方向,水平或者竖直,默认为水平1 2 3 4 5 6 7 8 9 10 11 12 13 14 15 16 17 18 19 20 21 22 23 24 25 26 27 28 29 30 31 32<template> <div class="vue-tab"> <slot></slot> </div> </template> <script lang="ts"> import {Component, Prop, Vue} from 'vue-property-decorator'; @Component export default class VueTab extends Vue { name = 'VueTab'; @Prop({type: String, required: true}) selected!: string; @Prop({ type: String, default: 'horizontal', validator(value: string): boolean { return ['horizontal', 'vertical'].includes(value); } }) direction!: string; created() { // this.$emit('update:selected', 'xxx'); } } </script> <style lang="scss" scoped> .vue-tab { } </style>
Tabs.vue中的展示
|
|
- 注意
<VueTabNav class="custom-class">中,UI使用者可提供自定义样式custom-classvue默认会将VueTabNav本身的样式和UI使用者提供的样式合并显示在class属性中,而不是后者覆盖前者vue中只有两个属性如此:class和style- 其他属性则直接覆盖
初步实现VueTabNav
需要传入的外部数据
- 无
提供 可选的 右侧附带按钮
使用具名插槽
<slot name="actions"></slot>
|
|
Tabs.vue中的展示
- 具名插槽可与匿名插槽
<slot></slot>同时使用 - 使用具名插槽时,
<template slot="xxx"></template>包裹内容 <template slot="actions"> <VueButton>额外的按钮</VueButton> </template>1 2 3 4 5 6 7 8 9 10 11 12 13 14 15 16 17 18 19 20 21 22 23 24 25 26 27 28 29 30 31 32 33 34 35 36 37 38 39 40 41 42 43 44 45 46 47 48 49 50 51 52<template> <div> <form> <fieldset> <legend>Tabs 提供 可选的 右侧附带按钮</legend> <details open> <summary>Primary</summary> <VueTab :selected.sync="selectedTab"> <VueTabNav> <template slot="actions"> <VueButton>额外的按钮</VueButton> </template> <VueTabItem name="tab1">Tab1</VueTabItem> <VueTabItem name="tab2" disabled>Tab2</VueTabItem> <VueTabItem name="tab3">Tab3</VueTabItem> </VueTabNav> <VueTabContent> <VueTabPane name="tab1">Tab1 Content</VueTabPane> <VueTabPane name="tab2">Tab2 Content</VueTabPane> <VueTabPane name="tab3">Tab3 Content</VueTabPane> </VueTabContent> </VueTab> </details> </fieldset> </form> <br> </div> </template> <script lang="ts"> import {Component, Vue} from 'vue-property-decorator'; import VueTab from './tabs/VueTab.vue'; import VueTabNav from './tabs/VueTabNav.vue'; import VueTabItem from './tabs/VueTabItem.vue'; import VueTabContent from './tabs/VueTabContent.vue'; import VueTabPane from './tabs/VueTabPane.vue'; import VueIcon from './icon/VueIcon.vue'; import VueButton from '@/components/button/VueButton.vue'; @Component({ components: {VueButton, VueIcon, VueTab, VueTabNav, VueTabPane, VueTabContent, VueTabItem} }) export default class Tabs extends Vue { name = 'Tabs'; selectedTab = 'tab1'; } </script> <style lang="scss" scoped> .custom-class {} </style>
初步实现VueTabItem
需要传入的外部数据
disabled表示是否禁用1 2 3 4 5 6 7 8 9 10 11 12 13 14 15 16 17 18 19 20<template> <section class="tab-item"> <slot></slot> </section> </template> <script lang="ts"> import {Component, Prop, Vue} from 'vue-property-decorator'; @Component export default class VueTabItem extends Vue { name = 'VueTabItem'; @Prop({type: Boolean, default: false}) disabled!: boolean; } </script> <style lang="scss" scoped> .tab-item { } </style>
初步实现VueTabContent
需要传入的外部数据
``
1 2 3 4 5 6 7 8 9 10 11 12 13 14 15 16 17 18 19 20<template> <nav class="tab-content"> <slot></slot> </nav> </template> <script lang="ts"> import {Component, Inject, Vue} from 'vue-property-decorator'; @Component export default class VueTabContent extends Vue { name = 'VueTabContent.vue'; @Inject('eventBus') readonly eventBus!: Vue; } </script> <style lang="scss" scoped> .tab-content { } </style>
使用依赖注入和eventBus触发事件和传值
组件间跨级通信
Tabs结构
|
|
- 在
Tabs上默认selected = item1
当切换
selected = item2,如何通知导航区与内容区同步切换?
逐级通知
Tabs-->TabNav-->每个item:- 每个item都监听是否选择到自己
- 如果显示,则要通知兄弟节点隐藏
Tabs-->TabContent-->每个pane:- 每个pane都监听是否选择到自己
- 如果显示,则要通知兄弟节点隐藏
显然随着层数变得复杂,带来的维护成本急速上升
- 每个被切换到的
item都需要执行:- 1.触发事件
update:selected–>itwm* - 2.显示自己
- 3.通知兄弟隐藏
- 4.通知对应
pane显示 - 5.通知其他
pane隐藏
- 1.触发事件
- 逐级通知需要沿着
item-->TabNav-->Tabs-->TabContent-->pane1走逻辑- 每条逻辑上都需代码实现,难以维护
跨级通知
使用事件总线
EventHub或EventBus作为媒介来统筹全局
item-->EventBus-->每个items和每个pane- 这种模式称为发布订阅模式
item发布事件- 其他组件监听这个事件
- 代码实现较逐级通知大大简化
使用vue作为事件总线 EventBus
需要配合
Provide和Inject来跨级传值,并添加一个data来中转
VueTab.vue中可通过this.eventBus直接访问到1 2 3 4 5 6 7 8 9 10 11 12 13 14 15 16 17 18 19 20 21 22 23 24 25 26 27 28 29 30 31 32<template> <div class="vue-tab"> <slot></slot> </div> </template> <script lang="ts"> import {Component, Prop, Provide, Vue} from 'vue-property-decorator'; @Component export default class VueTab extends Vue { name = 'VueTab'; @Prop({type: String, required: true}) selected!: string; @Prop({ type: String, default: 'horizontal', validator(value: string): boolean { return ['horizontal', 'vertical'].includes(value); } }) direction!: string; eventBus = new Vue; @Provide('eventBus') eBus = this.eventBus; created() { console.log('this: ', this); console.log('eventBus: ', this.eventBus); // this.$emit('update:selected', 'xxx'); } } </script>在祖先组件的
Provide中添加属性- 则其所有子孙组件的
Inject属性中都可访问到
- 则其所有子孙组件的
Provide配合eventBus(vue的普通实例)实现跨组件通信可在控制台看到实例
this中的eventBus属性和_provided属性_*开头的属性为框架内部开发使用,一般UI开发不使用$*开头的方法是vue提供直接使用者的API
在子/孙组件中添加
inject,以VueTabNav.vue为例
|
|
- 可在控制台看到实例
this中的eventBus属性 - 每个子/孙得到同一个
eventBus的引用
实现VueTabItem点击事件,发布tabName属性,跨级传值
VueTabItem.vue
|
|
- 每个
VueTabItem组件- 即点击后发布
this.eventBus.$emit('update:selected', this.tabName); - 又监听
this.eventBus.$on('update:selected', (...)=>{...})事件
- 即点击后发布
实现VueTabPane.vue
需要传入的外部数据
paneName
监听事件this.eventBus.$on('update:selected', (..)=> {...}
|
|
- 每个
VueTabPane组件- 监听
this.eventBus.$on('update:selected', (...)=>{...})事件
- 监听
注意vue不会将事件主动冒泡到外层节点中
区分实例本身的
this.$emit和eventBus的this.eventBus.$emit
|
|
- 即使绑定监听了自定义事件
@update:selected="yyy"<VueTab :selected.sync="selectedTab" @update:selected="yyy">- 并不会执行
yyy
- 而如果在组件实例本身监听
this.$emit('update:selected', '这是 this.$emit 出来的数据');- 会执行
yyy
- 会执行
- 需要明确自定义事件是在哪个对象上触发的
- 在
this - 在
this.eventBus
- 在
在子组件
VueTabNav上发布事件this.$emit('update:selected', '这是 this.$emit 出来的数据');,能否触发父组件上的回调<VueTab :selected.sync="selectedTab" @update:selected="yyy">?
|
|
- 并不会触发
yyy - 在子组件发布中的自定义事件,不会冒泡值父组件上
- 除非绑定DOM的默认事件,比如点击事件
小结
- 明确事件调用的目标对象,即在哪个对象上执行回调,就只能在哪个对象上监听该事件
- 事件不会冒泡,即在子组件上的事件,不会自动冒泡到父组件上
补充vue的事件系统
|
|
new Vue()提供一个实例- 只需要借用实例的接口
$emit()、$on()、$once()、$off() - 需要一个和外界隔离的
eventBus
参考
VueTabNav加样式
<slot></slot>渲染到页面时,会消失,所以不能直接加class属性- 需要包裹一层
<div class="actions-wrapper"><slot name="actions"></slot></div>
将元素靠右
加样式
margin-left: auto;将元素靠右1 2 3 4 5 6 7 8 9 10 11 12 13 14 15 16 17 18 19 20 21 22 23 24 25 26 27 28 29 30 31 32 33<template> <nav class="tab-nav"> <slot></slot> <div class="actions-wrapper"> <slot name="actions"></slot> </div> </nav> </template> <script lang="ts"> import {Component, Inject, Vue} from 'vue-property-decorator'; @Component export default class VueTabNav extends Vue { name = 'VueTabNav.vue'; @Inject('eventBus') readonly eventBus!: Vue; } </script> <style lang="scss" scoped> $tab-nav-height: 40px; .tab-nav { display: flex; height: $tab-nav-height; justify-content: flex-start; align-items: center; > .actions-wrapper { margin-left: auto; } } </style>
实现切换Tab
VueTabNav.vue
控制 激活显示tab 的数据 使用
data还是props?
|
|
VueTab无需知道内部组件VueTabItem和VueTabPane的active状态,无需手动传props值- 点击
VueTabItem- 该
VueTabItem状态active变为true - 其他
VueTabItem状态active变为false - 显示对应
VueTabPane - 隐藏其他
VueTabPane
- 该
VueTabItem.vue
|
|
- 子组件在创建(created)后绑定监听
this.eventBus.$on('update:selected', (name: string) => {...} - 判断传来的值是否为属性
this.tabName的值- 是
this.active = true - 否
this.active = false
- 是
- 默认
active = false; - 绑定计算属性
:class="classes"get classes() { return { active: this.active } }
- 添加样式
.active { background-color: #eee; }
VueTab.vue
- 在子组件挂载(mounted)后,将
this.selected通过事件总线eventBus给所有子/孙组件发布this.eventBus.$emit('update:selected', this.selected);
相当于广播了一个消息
1 2 3 4 5 6 7 8 9 10 11 12 13 14 15 16 17 18 19 20 21 22 23 24 25 26 27 28 29 30 31 32 33 34 35<template> <div class="vue-tab"> <slot></slot> </div> </template> <script lang="ts"> import {Component, Prop, Provide, Vue} from 'vue-property-decorator'; @Component export default class VueTab extends Vue { name = 'VueTab'; @Prop({type: String, required: true}) selected!: string; @Prop({ type: String, default: 'horizontal', validator(value: string): boolean { return ['horizontal', 'vertical'].includes(value); } }) direction!: string; eventBus = new Vue; @Provide('eventBus') eBus = this.eventBus; mounted() { this.eventBus.$emit('update:selected', this.selected); } } </script> <style lang="scss" scoped> .vue-tab { } </style>
VueTabPane.vue
- 同样地在
VueTabPane.vue中通过事件总线监听 - 绑定计算属性
:class="classes"get classes() { return { active: this.active } }
- 添加样式
.active { background-color: #eee; } 并且隐藏
active = false的VueTabPane组件1 2 3 4 5 6 7 8 9 10 11 12 13 14 15 16 17 18 19 20 21 22 23 24 25 26 27 28 29 30 31 32 33 34 35 36 37 38 39 40 41 42 43 44<template> <section class="tab-pane" :class="classes" v-if="active"> <slot></slot> </section> </template> <script lang="ts"> import {Component, Inject, Prop, Vue} from 'vue-property-decorator'; @Component export default class VueTabPane extends Vue { name = 'VueTabPane'; active = false; @Prop({type: String, required: true}) paneName!: string; @Inject('eventBus') readonly eventBus!: Vue; get classes() { return { active: this.active } } created() { this.eventBus.$on('update:selected', (name: string) => { if (name === this.paneName) { console.log(`我${this.paneName}被子选中了`); this.active = true; } else { console.log(`我${this.paneName}未被子选中`); this.active = false; } }); } } </script> <style lang="scss" scoped> .tab-pane { &.active { background-color: #eee; } } </style>
展示组件
Tabs.vue
|
|
在
VueTabNav初始传第一个tab的tabName
|
|
增加样式
增加
tab的可交互区域 为VueTabNav.vue增加样式
|
|
VueTabItem.vue增加样式
|
|
增加 tab 切换动画
增加下划线
VueTabNav.vue
|
|
下划线如何加切换效果,使得下划线随着tab切换移动位置
如何切换
- 需要获取元素(这里是 VueTabNav 中组件)的宽度与位置(
left)
update:selected事件触发时,在VueTab.vue中发布多传一个选中实例的参数 到 事件总线
- 需要找到选择的实例
vm - 即需要找到子组件中哪一个实例的
tabName为this.selected- 先选对子组件
vm.$options.name === 'VueTabNav' - 再选择出孙级组件
item.$options.name === 'VueTabItem' && item.tabName === this.selected - 将选出的组件实例发布到
this.eventBus中,让VueTabNav.vue监听到,获得传参
- 先选对子组件
VueTab.vue
|
|
- 通过两层循环得到选择到的实例
item - 最关键的一步就是
this.eventBus.$emit('update:selected', this.selected, item);
VueTabNav.vue
console.log(vm.$el.getBoundingClientRect());中的实例vm在第一次初始化时未从VueTab中传过来- 所以需要先在
VueTab.vue中判断选中的实例,将实例传过来
- 所以需要先在
Element.getBoundingClientRect()获取元素尺寸与位置const {width, left} = vm.$el.getBoundingClientRect();- 获取宽度
(this.$refs.line as HTMLElement).style.width =${width}px; - 获取位置,使其可移动至所需位置
(this.$refs.line as HTMLElement).style.left =${left - parentLeft}px; 使用硬件3D加速 (this.$refs.line as HTMLElement).style.transform = `translateX(${left - parentLeft}px)`; });
1 2 3 4 5 6 7 8 9 10 11 12 13 14 15 16 17 18 19 20 21 22 23 24 25 26 27 28 29 30 31 32 33 34 35 36 37 38 39 40 41 42 43<template> <div class="tab-nav-wrapper"> <nav class="tab-nav"> <slot></slot> <div class="line" ref="line"></div> </nav> <div class="actions-wrapper"> <slot name="actions"></slot> </div> </div> </template> <script lang="ts"> import {Component, Inject, Vue} from 'vue-property-decorator'; import {VueTabItem} from '@/types/VueTabItem'; @Component export default class VueTabNav extends Vue { name = 'VueTabNav'; @Inject('eventBus') readonly eventBus!: Vue; created() { this.eventBus.$on('update:selected', (tabName: string, vm: VueTabItem) => { console.log(tabName); console.log(vm.$el.getBoundingClientRect()); const {width, left} = vm.$el.getBoundingClientRect(); const parentLeft = vm.$parent.$el.getBoundingClientRect().left; (this.$refs.line as HTMLElement).style.width = `${width}px`; // (this.$refs.line as HTMLElement).style.left = `${left - parentLeft}px`; (this.$refs.line as HTMLElement).style.transform = `translateX(${left - parentLeft}px)`; }); } mounted() { this.$nextTick(() => { this.eventBus.$emit('update:selected', (this.$children[0] as VueTabItem).tabName, this.$children[0]); }); } } </script>
created时 下划线元素还未挂载,之后改为在mounted中执行this.eventBus.$on('update:selected', (tabName: string, vm: VueTabItem) => {...}
当点击
VueTabItem.vue,再发布一个 选中实例
this.eventBus.$emit('update:selected', this.tabName, this);1 2 3 4 5 6 7 8 9 10 11 12 13 14 15 16 17 18 19 20 21 22 23 24 25 26 27 28 29 30 31 32 33 34 35 36 37 38 39 40 41 42 43 44 45 46 47 48 49 50 51 52<template> <section class="tab-item" @click="xxx" :class="classes"> <slot></slot> </section> </template> <script lang="ts"> import {Component, Inject, Prop, Vue} from 'vue-property-decorator'; @Component export default class VueTabItem extends Vue { name = 'VueTabItem'; active = false; @Prop({type: Boolean, default: false}) disabled!: boolean; @Inject('eventBus') readonly eventBus!: Vue; @Prop({type: String, required: true}) tabName!: string; xxx() { this.eventBus.$emit('update:selected', this.tabName, this); } get classes() { return { active: this.active }; } created() { this.eventBus.$on('update:selected', (name: string) => { this.active = (name === this.tabName); }); } } </script> <style lang="scss" scoped> $waterBlue: #3ba0e9; .tab-item { flex-shrink: 0; padding: 0 1em; cursor: pointer; height: 100%; display: flex; align-items: center; &.active { color: $waterBlue; } } </style>在其他组件中的事件总线中监听时多监听一个参数
this.eventBus.$on('update:selected', (tabName: string, vm: VueTabItem) => {...}
v-if 与 $nextTick
控制下划线
<div class="line" ref="line" v-if="showLine"></div>出现的时机
v-if会控制 div 出否存在于内存中this.showLine = true;改变v-if="true"挂载节点到DOM中 会新增一个「更新UI任务」到任务队列中- 但此时页面还未渲染出
<div class="line" ref="line" v-if="showLine"></div>this.$refs.line为undefined
必须使用
this.$nextTick(() => {...});将代码执行放到「更新UI任务」之后否则取不到
this.$refs.line1 2 3 4 5 6 7 8 9 10 11 12 13 14 15 16 17 18 19 20 21 22 23 24 25 26 27 28 29 30 31 32 33 34 35 36 37 38 39 40 41 42 43 44 45 46 47 48 49 50 51 52 53 54 55 56 57 58 59 60 61 62 63 64 65 66 67 68 69 70 71 72 73 74 75<template> <div class="tab-nav-wrapper"> <nav class="tab-nav"> <slot></slot> <!-- v-if 会控制 div 出否存在于内存中 --> <div class="line" ref="line" v-if="showLine"></div> </nav> <div class="actions-wrapper"> <slot name="actions"></slot> </div> </div> </template> <script lang="ts"> import {Component, Inject, Vue} from 'vue-property-decorator'; import {VueTabItem} from '@/types/VueTabItem'; @Component export default class VueTabNav extends Vue { name = 'VueTabNav'; showLine = false; @Inject('eventBus') readonly eventBus!: Vue; initSelectedTabItem() { this.eventBus.$emit('update:selected', (this.$children[0] as VueTabItem).tabName, this.$children[0]); } // 监听到选择的实例 取得实例元素的尺寸 移动位置 moveTab() { this.eventBus.$on('update:selected', (tabName: string, vm: VueTabItem) => { const {width, left} = vm.$el.getBoundingClientRect(); const parentLeft = vm.$parent.$el.getBoundingClientRect().left; (this.$refs.line as HTMLElement).style.width = `${width}px`; // (this.$refs.line as HTMLElement).style.left = `${left - parentLeft}px`; (this.$refs.line as HTMLElement).style.transform = `translateX(${left - parentLeft}px)`; }); } mounted() { this.showLine = true; // 改变v-if 挂载节点到DOM中 会新增一个「更新UI任务」到任务队列中 this.$nextTick(() => { this.moveTab(); this.initSelectedTabItem(); }); } } </script> <style lang="scss" scoped> $tab-nav-height: 40px; $waterBlue: #3ba0e9; .tab-nav-wrapper { .tab-nav { display: flex; height: $tab-nav-height; justify-content: flex-start; align-items: center; position: relative; > .line { position: absolute; bottom: 0; height: 0; border-bottom: 1px solid $waterBlue; transition: all .3s; } } .actions-wrapper { margin-left: auto; } } </style>
重构代码
解决BUG的思路
参考