VueButton添加单元测试
[toc]
添加单元测试与Mock数据
Chai让测试更方便,断言代码符合自然语言描述
Chai.js官网 https://www.chaijs.com/BDD-Behavior-Driven Development自然语言描述需求foo.shoud.be.a('string')TDD-Test-Driven Development测试驱动开发——根据需求写出用例,实现用例,测试通过Assert断言:主观的判断语句console.assert(1 === 1)控制台内置的简单断言,断言判断为真,则后台无任何提示console.assert(1 === 2)- 断言判断为假,则报错Asseration failedconsole.assert( !!document.body )断言存在
符合自然语言的断言,类似
assert('1').is.a('string')(伪代码)
- 三种断言的形式:
shouldexpectassert - 使用最直观的
expect:expect(varidate).to.be.a('string') Chai.js前端速查表Mocha与chaiChai.js断言库API中文文档- 深度解读 - TDD(测试驱动开发)
安装
chai
|
|
|
|
引入
App.vue
|
|
动态生成一个按钮(组件)const Constructor = Vue.extend(VueButton)
VueButton是一个对象,无法通过对象去实例化- 需要 构造函数
const Constructor = Vue.extend(VueButton)- 扩展为
VueComponent函数
- 扩展为
- 实例化
const button = new Constructor() - 挂载到一个节点上
button.$mount('#test') - 区别于直接把按钮写在页面里,是通过JS把按钮写在页面里
App.vue动态创建按钮
|
|
- 扩展为全局的 VueComponent 函数
- 选项合并
- propsData 只用于 new 创建的实例中
App.vue
|
|
- Vue 动态创建实例
- 错误断言
expect(useElement.getAttribute('xlink:href')).to.equal('settings'),报错Uncaught AssertionError - 正确断言
expect(useElement.getAttribute('xlink:href')).to.eq('#i-settings'),可以通过的测试用例,满足预期 - 单元测试 放一个输入,期待一个输出,查看匹配
如何决定写几个单元测试
VueButton中看props有几个输入参数,就写几个测试用例:icon、isLoading、iconPosition
- 事件也需要测试用例
@click
需要的用例
- 测试所有
props- 测试
icon - 测试
isLoading - 测试
iconPosition,需要测试的是 CSS属性order- 测试
order默认为 1 左边 ;2 右边 - 测试
order为 2 右边
- 测试
- 测试
- 测试 事件 按钮触发
click
测试 isLoading 属性
- 先写错一个,看报错;再写对,看报错是否消失
- 属性
class同时给icon和loading,预期得到href属性为#i-loading
|
|
注意
$el取到VueButton.vue中的<button>...</button>button改成vm,表示实例
|
|
加载 button
button 必须被加载 渲染到页面的一个节点中,加载 CSS,才能识别 order,
否则页面就不渲染元素,CSS就无法加载到元素上,无法获得计算样式
即
expect(order).to.eq('')为空
- 将
button挂载到div上const div = document.createElement('div')document.body.appendChild(div)vm.$mount(div)
注意 CSS所有样式的值都是字符串
expect(order).to.eq(1)错误expect(order).to.eq("1")正确
清除测试代码中的用例
- 打扫战场
.$el.remove().$destroy()vm.$el.remove()vm.$destroy()
使用 chai.spies 监听函数,mock函数,测试事件
|
|
- 对于事件监听来说,不需要 CSS ,无需挂载到节点上
期望这个函数被执行
错误的做法是
vm.$on('click', ()=> {expect(1).to.eq(1)})const button = vm.$elbutton.click()
正确的做法是
- 引入
Chai Spies来mock函数执行import chai from 'chai'import spies from 'chai-spies'chai.use(spies)
- 声明 监听函数
const spy = chai.spy(()=> {...})
const button = vm.$el点击button.click()后,期望expect(spy).to.have.been.called()
单元测试小结
- 测试的内容
- 外部属性值 是否符合预期
- 挂载后 CSS 属性值 是否符合预期
- 事件使用
Chai Spies函数mock执行 是否被执行
- 代码块包裹的作用是作用域隔离
- 在之后的
Karma + Mocha测试文件中使用函数的作用域进行隔离 - 测试最重要的就是作用域隔离和断言
- 通过描述把所有功能用测试用例写一遍
- 单元测试可以通过代码测试代码是否正确
警告:
npm link在Windows上会抽风
- 如果你
npm link之后项目报错,你就不要再用npm link了 - 只需要每次改完代码后
npm publish,然后再在另一个地方npm install xxx@0.0.x即可。
打开浏览器>运行测试用例>刷新页面>关闭浏览器 如何一气呵成
自动化测试
- 输入一行命令,打包文件
- 自动打开
Chrome,输入网址,测试用例 - 自动点刷新
- 自动使用
Karma可以做到一行命令测试代码 - 自动关闭浏览器,并打印返回浏览器输出的结果
- 这就是持续集成
使用 Karma + Mocha 做单元测试
Karma([ˈkɑrmə] 卡玛)是一个 测试运行器,它可以呼起浏览器,加载测试脚本,然后运行测试用例Mocha([ˈmoʊkə] 摩卡)是一个 单元测试框架/库,它可以用来写测试用例Sinon(西农)是一个spy / stub / mock库,用以辅助测试(使用后才能理解)
单元测试步骤
1.安装各种工具
|
|
- 成功安装
|
|
2.创建 karma 配置
karma.conf.js
|
|
其中
files: ['dist/**/*.test.js', 'dist/**/*.test.css'],配置测试用例的路径**表示任意层级的路径,比如test/a/b/c/d/...'dist/**/*.test.css'如果不配置,就不会加载默认的 CSS(parcel打包会拆分中的 CSS)
browsers: ['Chrome'],表示 期望打开的浏览器,不同浏览器需要设置插件,默认为Chrome
3.创建 test/button.test.js 文件
- 注意文件路径是否正确
- 按照项目的实际路径导入
import Button from '../src/components/vuebutton/VueButton.vue'
|
|
如何写测试用例
- 回顾之前使用代码块隔离,写的六个测试用例
- 使用代码块
{}来进行作用域隔离,防止同名变量冲突 - 需要断言
expect(...) - 只能通过注释来命名提示以区分
- 使用代码块
对比mocha的测试用例
describe和it属于Mocha.js的语法- 具体的断言
expect(...)属于Chai.js - 每一个
it就是一个新的测试用例- 不同
it之间通过 函数作用域 进行 作用域隔离it第一个参数是描述该用例的文字,比用代码块隔离更清晰it第二个参数是执行测试用例的回调函数
- 不同
如何描述行为
- 使用
describe("被描述的对象", ()=> {it(...)})- 描述对象的一系列行为
it描述可以做什么(第一个参数),并怎样实现描述的行为(第二个参数为执行回调函数)
通常被称为
BDD行为驱动测试,进行行为描述,期待预期结果
expect(Button)to.be.ok描述 Button不是 falsy 值 (null '' undefined 0 …),即存在- 写法
expect(xxx instanceof Array).to.eq(true)expect写表达式.eq()写期待值
无实际意义的属性
tobe虚词 和 具有实际意义的词notdeepeq
.not用法:expect(Button).to.be.not.ok.deep用法:expect([1, 2]).to.eq([1, 2])得到期待值false浅相等 比较引用地址expect([1, 2]).to.deep.eq([1, 2])得到期待值true深相等 比较每一个元素
expect(NaN).to.be.NaN得到期待值true
使用sinon.fake()作为spy函数;vm.$el.click()触发点击事件后期待回调函数callback被调用
const callback = sinon.fake()设置回调函数- 不能使用自定义的函数
const fn = function() {...} - 从技术层面上说,无法单单从
fn本身知道函数是否被调用 - 需要某些标志记录,使用
sinon提供的假函数fake()
- 不能使用自定义的函数
vm.$on('click', callback)绑定监听事件vm.$el.click()触发事件expect(callback).to.have.been.called期待回调函数执行
AsserationError
- 断言错误
- 测试不符合预期,则报错
参考
Chai.js BDD API官网 https://www.chaijs.com/api/bdd
4.创建测试脚本
在
package.json里面找到"scripts"增加代码
|
|
- 如果是
mac用户,以上脚本配置是OK的 Windows用户运行npm run dev-test时会出现 BUG
解决办法
- 启动两个终端 分开执行命令
parcel watch test/* --no-cache和karma start - 提示找不到命令,加上
npx parcel watch test/* --no-cache和npx karma start
|
|
不要缓存
"test": "rm -rf .cache dist && parcel build test/* --no-cache --no-minify && karma start --single-run",
parcel build test/* --no-cache --no-minify打包button.test.js成为dist/button.test.js,将所有引用作为源代码拷入karma start --single-run按照karma.conf.js里的配置运行 karma
以下代码告诉
karma测试用例的路径karma.conf.js
|
|
- 加载
.test.css是为了加载默认 CSS,实际上加载的时打包后的dist/button.test.css,即原来VueButton.vue里的 CSS
5.运行测试脚本
使用 npm run test 一次性运行
回顾
npm run test做了些什么
- 运行
package.json中的"scripts"对应的命令 parcel build test/* --no-cache --no-minify打包test目录下的所有文件test/*: 所有文件夹中的一级文件--no-cache: 无缓存--no-minify: 不要压缩代码
karma start --single-run启动Karma,只运行一次
使用 npm run dev-test 进行 watch 监视运行
- 使一改代码就运行一遍测试
- 打包监视途中不要关闭测试浏览器窗口
- 不用手动多次输入测试命令
回顾
npm dev-test做了些什么
- 运行
package.json中的"scripts"对应的命令 parcel watch test/* --no-cache打包test目录下的所有文件test/*: 所有文件夹中的一级文件--no-cache: 无缓存
& karma start启动Karma,一直运行
npm dev-test监视运行的时间差
- 在第一次打包
parcel watch test/* --no-cache时,karma已经启动了 karma启动后马上就会先测试一次- 等第一次打包完,
karma发现文件变更了,再次运行一次测试 - 所以在终端可以看到两次测试结果
parcel监视代码变更,重新打包代码,karma监视编译后的测试文件变更,重新测试
6. 成果
- 开发的时候新开一个命令行窗口运行
npm run dev-test就可以实时查看测试结果 - 只想看一次结果,就只用运行
npm run test - 在终端显示测试结果
怎么每次代码改变自动运行
npm run test
dev-test自动测试并监视变化,自动重新运行测试,不停止
总结
Karma做了什么
- 打包
JS - 打开浏览器
- 启动服务器,输入
url地址 - 运行测试用例
- 关闭浏览器
- 显示浏览器输出信息
不用自己运行命令,还能实现自动跑测试
- 使用第三方的持续集成服务
Tracis CI或者Circle CI或者GitHub Actions - 可以查看完整的测试经过和结果报告
- 持续集成服务 Travis CI 教程 - 阮一峰的网络日志
在测试用例中使用 TypeScript
- 所有的
TypeScript模块都有其对应的*.d.ts文件,用来告诉我们这个模块是做什么的,提供了什么可以使用 - 在测试用例编写时,可以通过IDE动态提示来快速的书写断言,而不需要结合着文档去进行“翻译”
使用方式
- 写过
mocha和chai的童鞋,基本上修改文件后缀+安装对应的@types即可
安装依赖
TypeScript相关的安装,yarn add -D typescript ts-nodeMocha、chai相关的安装,yarn add -D mocha chai @types/mocha @types/chaisinon、sinon-chai相关的安装,yarn add -D @types/sinon @types/sinon-chai- 如果需要涉及到一些API的请求,可以额外安装
chai-http,yarn add -D chai-http @types/chai-http - 安装完后,IDE使用清除缓存重启
持续集成
为了保证代码的质量和软件的稳定,需要做持续集成
持续集成的内容
- 持续测试
- 持续交付
- 持续部署
可以跳过改用免费版
GitHub Actions,代替Travis CI
使用Travis CI做持续集成
创建Travis CI配置文件
项目根目录下创建
.travis.yml
|
|
- 注意,
karma.conf.js中浏览器的配置需要改为无界面浏览器,例如"ChromeHeadless"
注册Travis CI网站账号
使用 github 绑定账号
- 保证能同步 github 仓库
- 验证账户
选择代码仓库
- 点击
My Repositories旁 的加号 - 搜索仓库
- 将仓库toggle按钮拨亮
travis接入完成
只要一
push代码,就会自动触发持续测试
Travis CI迁移至GitHub Actions
使用GitHub Actions代替Travis CI
GitHub Actions配置文件(文件名任意)
在 GitHub 上的项目根目录下创建路径 文件
/.github/workflows/unit-test-actions.yml(文件名任意,文件类型为.yml)
|
|
- 名字
name: CI - 分支
on:push:branches: [ main ]
pull_request:branches: [ main ]
- 任务s:
jobs:- 任务名1
build:- 运行环境
runs-on: ubuntu-latest - 策略
strategy:- 矩阵
matrix:node-version: [12.x, 14.x, 16.x]
- 矩阵
- 步骤s
steps:- 检查仓库分支
- uses: actions/checkout@v2 - 语言名
- name: Use Node.js ${{ matrix.node-version }}- 语言
uses: actions/setup-node@v1- 使用
with:- 版本
node-version: ${{ matrix.node-version }}
- 版本
- 使用
- 语言
- 安装依赖
- name: Install dependencies- 运行
run: yarn
- 运行
- 使用浏览器
- uses: browser-actions/setup-chrome@latest - 运行
- run: chrome --version - 构建
- run: yarn build - 测试
- run: yarn test
- 检查仓库分支
- 运行环境
- 任务名1
邮件通知
GitHub Actions默认只在测试失败时发邮件
手动开启运行成功的通知邮件 设置步骤
- 在 GitHub 任意页面点击右上角自己的头像
- 单击Settings(设置)
- 在用户设置侧边栏中,点击Notifications(通知)
- 取消勾选Send notifications for failed workflows only(仅在工作流程失败时通知)
可以观摩
Vue3.x的测试用例
小结
- 设置的浏览器必须是对应无界面的,
xxxHeadless
参考
- GitHub Actions 入门教程 阮一峰
- GitHub Actions 教程:定时发送天气邮件 阮一峰
- 使用 GitHub Actions 自动部署博客教程
- GitHub Actions Docs
https://juejin.cn/post/6896013374497226765 | VuePress自动化部署从travis到Github Actions https://juejin.cn/post/6847902222966079501 | Github Actions简单部署一个vue/react项目 https://juejin.cn/post/6942675520022642719 | 前端工程化之travis ci https://juejin.cn/post/6931980888267816974 | travis CI工具自动部署自己github项目 https://juejin.cn/post/6844904022239870984 | 真香!GitHub Action一键部署 https://juejin.cn/post/6844903957215576078 | 利用Travis CI+GitHub实现持续集成和自动部署 https://juejin.cn/post/6844904150753361934 | 用 GitHub Action 构建一套 CI/CD 系统 https://juejin.cn/post/6844904051537100813 | 编写自己的 GitHub Action,体验自动化部署 https://docs.github.com/cn/actions/learn-github-actions/migrating-from-travis-ci-to-github-actions?query=chrome | 从 Travis CI 迁移到 GitHub Actions - GitHub Docs https://github.com/browser-actions/setup-chrome | browser-actions/setup-chrome: Set up your GitHub Actions workflow with a specific version of chromium https://github.com/marketplace/actions/setup-chromedriver | setup-chromedriver · Actions · GitHub Marketplace https://github.community/t/how-to-install-google-chrome-browser-in-github-actions-workflow/18471 | How to install Google Chrome browser in GitHub Actions workflow? - Code to Cloud / GitHub Actions - GitHub Support Community https://github.community/t/how-to-get-latest-stable-release-chrome-browser-in-workflow/18522 | How to get latest stable release Chrome browser in workflow? - Code to Cloud / GitHub Actions - GitHub Support Community https://remarkablemark.org/blog/2020/12/12/headless-test-in-github-actions-workflow/ | Run headless test with GitHub Actions | remarkablemark https://httptoolkit.tech/blog/migrating-javascript-from-travis-to-github-actions/ | Migrating a JS project from Travis to GitHub Actions | HTTP Toolkit https://docs.github.com/cn/actions/learn-github-actions/migrating-from-travis-ci-to-github-actions?query=chrome#default-environment-variables | 从 Travis CI 迁移到 GitHub Actions - GitHub Docs https://docs.github.com/cn/actions/quickstart | GitHub Actions 快速入门 - GitHub Docs https://docs.github.com/cn/actions/learn-github-actions/introduction-to-github-actions#create-an-example-workflow | GitHub Actions 简介 - GitHub Docs https://docs.github.com/cn/actions/guides/publishing-nodejs-packages | 发布 Node.js 包 - GitHub Docs https://docs.github.com/cn/actions/reference/workflow-syntax-for-github-actions#jobsjob_idruns-on | GitHub Actions 的工作流程语法 - GitHub Docs https://github.com/xmasuhai/vueel-demo | xmasuhai/vueel-demo https://hateonion.me/posts/20feb22/ | 持续部署新法宝 - Github Actions | OnionTalk http://www.cxyzjd.com/article/hanziyuan08/102389235 | 抛弃Travis,Github Actions和Codecov整合教程_Bpazy的博客-程序员宅基地 - 程序员宅基地 https://copyfuture.com/blogs-details/20210118120350405p | CI/CD 平台迁移实践:从 Travis-CI 转移到 Github Action - 复制未来 https://wuxinhua.com/2019/11/30/Migrating-from-travis-to-GitHub-Actions/ | 译文:从 Travis 迁移至 GitHub Actions | Kevin’s Notes https://segmentfault.com/a/1190000039001552 | CI/CD 平台迁移实践:从 Travis-CI 转移到 Github Action - SegmentFault 思否 https://www.lihuanyu.com/%E5%B7%A5%E7%A8%8B%E5%8C%96/%E4%BB%8ETravis%E8%BF%81%E7%A7%BB%E5%88%B0GitHub-Actions/ | 从Travis迁移到GitHub-Actions | 牧宇的Blog https://linux.cn/article-13022-1.html | 技术|CI/CD 平台迁移实践:从 Travis-CI 转移到 Github Action https://chengxuyuanwenku.tumblr.com/post/640482389551988736/cicd-%E5%B9%B3%E5%8F%B0%E8%BF%81%E7%A7%BB%E5%AE%9E%E8%B7%B5%E4%BB%8E-travis-ci-%E8%BD%AC%E7%A7%BB%E5%88%B0-github-action | 程序员文库 · CI/CD 平台迁移实践:从 Travis-CI 转移到 Github Action https://www.shangmayuan.com/a/07fd658682cf47d0b4d427af.html | CI/CD 平台迁移实践:从 Travis-CI 转移到 Github Action - 尚码园 http://pinkyjie.com/2016/02/27/continuous-integration-with-travis-ci/ | 用 TravisCI 来做持续集成 | 进击的马斯特 https://segmentfault.com/a/1190000020592707 | 利用Travis CI+GitHub实现持续集成和自动部署 - SegmentFault 思否 https://www.git2get.com/av/88740507.html | 【分享】Mocha + Karma框架测试用例接入travis CI,chrome无法启动的三种解决方式 | 1024toyou.com https://blog.forecho.com/github-action-vs-travis-ci.html | GitHub Action 和 Travis CI 对比 - forecho’s Blog https://www.cnblogs.com/champyin/p/11621898.html | 利用Travis CI+GitHub实现持续集成和自动部署 - champyin - 博客园 https://www.cnpython.com/qa/192099 | Travisci构建失败,但测试在本地通过 - 问答 - Python中文网 https://docs.github.com/cn/actions/learn-github-actions/migrating-from-travis-ci-to-github-actions | 从 Travis CI 迁移到 GitHub Actions - GitHub Docs https://blog.csdn.net/DreamLi1314/article/details/109352648 | GitHub Actions CI/CD 解放码农双手_Jack Li 的博客-CSDN博客
发布npm包
1 确保代码测试通过了
npm run test全部是绿色(原谅色)才行。
2 上传代码到 npmjs.org
步骤
- 0 更新
package.json- 在
package.json里将版本号改为0.0.1,等做完各组件后再改成1.0.0 - 根目录下创建入口文件
index.js - 在
index.js里将想要导出的内容全部导出
- 在
- 1 去
https://www.npmjs.com/注册一个账户 - 2 确认一下邮箱(必须)
- 3 在项目根目录运行
npm adduser- 按提示输入用户名 密码 邮箱,注意登录名为用户名,不是邮箱
- 如果错误提示里面含有
https://registry.npm.taobao.org - 则说明
npm源目前为淘宝源,需要更换为npm官方源npm config list查看npm路径- 找到
registry=https://registry.npm.taobao.org/ - 注释掉
//registry=https://registry.npm.taobao.org/ - 或者改掉
registry=https://registry.npm.org/ - 或者设置
npm config set registry http://registry.npm.taobao.org/ - 查看
npm config get registry
- 显示
Logged in as xxx on https://registry.npmjs.org/.则说明登陆成功 - 再次确认
package.json中name,即为npm包的名字
- 4 运行
npm publish - 发布成功后显示
+ xxx@0.0.1
./index.js
|
|
3 试用自己的包
试用步骤
- 使用
vue-cli创建一个用于测试包的项目 - 使用
yarn add xxx安装包 - 使用
yarn serve启动服务 - 在入口文件引入自己的包
import {Button, ButtonGroup, Icon} from 'vueel-demo' - 控制台打印
console.log('Button: ', Button),查看是否正常输出
如果当前版本的node不支持import,需要用bable转译
- 进入包的目录
- 使用
parcel build index.ts --no-cache --no-minify转译单个文件:入口文件index.ts - 会在根目录下生成
dist,其中含有三个文件,index.jsindex.cssindex.map - 在包项目的
package.json中设置main字段改为"dist/index.js" - 升及下版本号
"version": "0.0.2", - 提交代码到github
- 切换淘宝源
npm config set registry https://registry.npm.org/ - 再发布npm
npm publish - 切换淘宝源
npm config set registry https://registry.npm.taobao.org/ - 虽然项目中忽略了
dist目录,但不影响npm发布
使用包时,未加载完全
- 注意转译时是否加了
--no-minify parcel build index.js --no-cache --no-minify
未加载样式
- 手动引入
xxx/dist/index.css
切换淘宝源
- 或者设置
npm config set registry https://registry.npm.taobao.org/ - 查看
npm config get registry - 不要用
cnpm,基本不维护了
npm publish 遇到 403
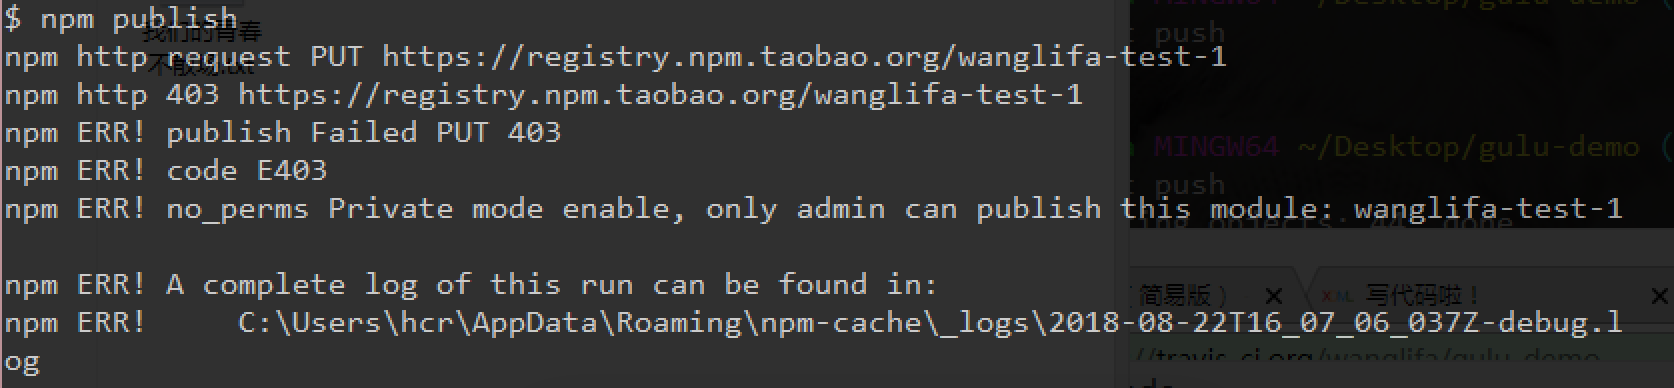
首先看log里面有没有 taobao 字样(截图中有)
- 如果有 这说明你没有切换到 npm 原始源,那么你只需要用
npm config delete registry删除淘宝源 - 然后再 publish
- publish 成功之后再切换回淘宝源
npm config set registry https://registry.npm.taobao.org - 如果嫌切换不方便,可以安装 nrm 来快速切换源
|
|
没有 taobao,看 log 里面有没有「spam detection」字样
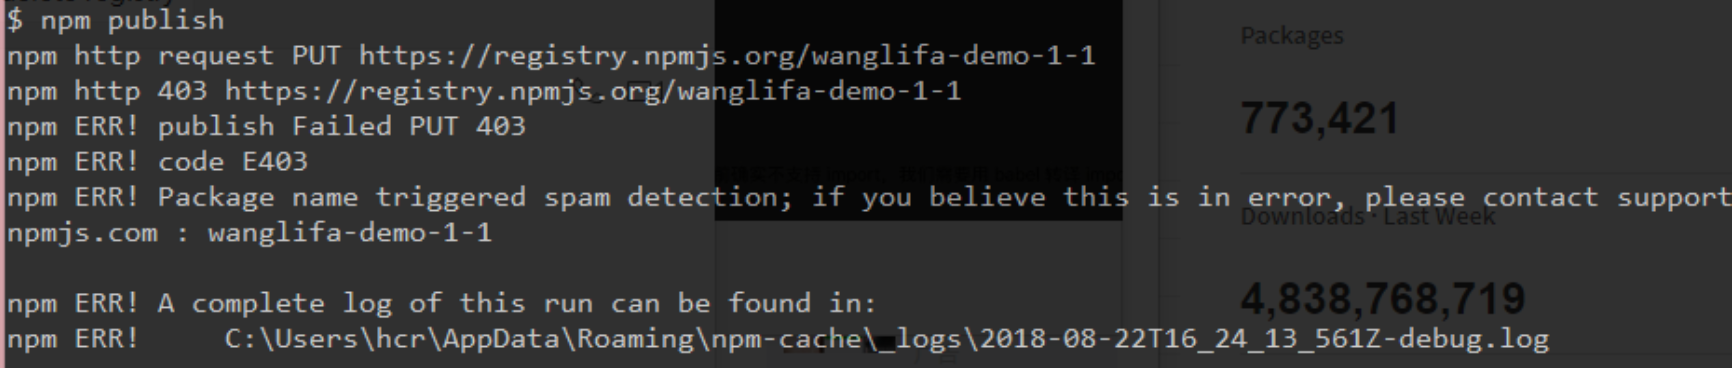
- 如果有
- 这说明 package name 看起来像是 spam(垃圾邮件)
- 需要换一个更正常的名字。比如 china-number-one-haha
- 如果没有
- 可能是你的 pacakge name 已经被人注册了,换个 name 试试
如何不用每次一改代码就得上传到npm,更新包,才能查看实际使用效果
使用本地注册 npm link
- 不用上传npm 就可引用包
yarn link也可- 本地调试,在项目目录使用
npm link - 然后在使用之处运行
npm link xxx,就是引用最新的
- 1 预测其他使用包的人会怎么使用
- 使用
vue-cli - 使用
webpack - 使用
parcel
- 使用
- 2 分别使用这些方式来试用自己的包(只以
vue-cli为例)- 使用过程中若发现报错说
import语法有问题 - 因为
node目前不支持import,需要用babel转译import - 可以要求使用者自己用
babel来转译 - 也可以转义好了再给别人用
npx parcel build index.js --no-minify- 本来不应该加
--no-minify的,奈何不加会有 bug,HTML 压缩把<slot/>标签全删了 - 将
package.json的 main 改为dist/index.js
- 使用过程中若发现报错说
- 3 使用
npm link或者yarn link来加速调试- 每次修改源码之后,有两条路让别人得到最新效果
- 更新
package.json里的version,然后npm publish - 别人通过
npm update xxx来更新 - 如果只是为了本地调试,可以在项目目录使用
npm link - 然后在使用之处运行
npm link xxx,就是最新了
- 更新
- 每次修改源码之后,有两条路让别人得到最新效果
警告:npm link 在 Windows 上会抽风
- 如果 npm link 之后项目报错,就不要再用 npm link 了
- 只需要每次改完代码后 npm publish ,然后再在另一个地方 npm install xxx@0.0.x 即可
将远程的SVG
<script src="//at.alicdn.com/t/font_2138557_rt8obmx2qyd.js"></script>,拷贝为本地svg.js
- 新建
svg.js - 从
//at.alicdn.com/t/font_2138557_rt8obmx2qyd.js拷贝所有内容到svg.js - 在
VueIcon.vue中引入:import './svg.js' - 去掉
index.html中对应的<script>标签
记录一个node入口文件名字的bug
- 当根目录下的入口文件名为
index.js时
过程
- 根目录入口文件为
index.js - 根目录下使用
npx parcel --no-cache或parcel --no-cache - 打开
http://localhost:1234 - 浏览器找不到页面
排查
- 排查之前,先确保提交代码
git commite -m 'xxx' git log查看所有提交版本记录- 找到最后一次功能可行的提交和最近一次功能失败的提交
- 不断地使用二分法找出两次提交之间的
commit哈希,缩小范围 - 复制整个哈希或前8位
- 使用
git reset --hard xx34xx78- 注意
git reset --hard会将磁盘上未提交的变更全部删除 - 确保已经提交代码
git commite -m 'xxx'
- 注意
- 重装依赖
yarn install - 找到后,使用
git show查看此次提交变更了什么 - 原因是增加了入口文件
index.jsNode.js的作者曾使用index.js作为默认入口文件名- 当运行
npm parcel --no-cache时,会默认先去找index.js文件 - 而转译实际上需要的是
index.html文件
- 使用
git reflog列出所有提交记录 git reset --hard xxxxxxx返回最近一次运行失败的commit- 运行
npx parcel --no-cache index.html,可显示页面 - 小结下就是
Node.js留了个坑,而parcel并未提示
防止忘记写,将命令写到
package.json的"scripts"字段中
|
|
https://note.youdao.com/web/#/file/recent/markdown/WEBcb5b2fa714bedf8bb94872dd26e9dce1/ | 有道云笔记 https://www.cnblogs.com/zuojiayi/p/6893330.html | npm发布包–所遇到的问题 - 缃言的Blog - 博客园 https://www.cnblogs.com/zhoudaozhang/p/4730070.html | npm ERR publish 403,nodejs发布包流程 - 周道长 - 博客园 https://blog.csdn.net/gamesdev/article/details/49018629 | npm发布注意事项_开发游戏,辉煌全中国-CSDN博客 https://www.cnblogs.com/songqingbo/articles/5611588.html | 快速切换npm源的开源工具–nrm - 南非波波 - 博客园 https://www.jianshu.com/p/6ffa934da70c | 发布npm包时遇到的问题及解决方法 - 简书 https://blog.csdn.net/Aria_Miazzy/article/details/111473961 | 发布npm包时遇到的问题及解决方法_YunWisdom-CSDN博客 https://cloud.tencent.com/developer/article/1454387 | 发布自己的npm包及报错解决办法 - 云+社区 - 腾讯云 https://zhuanlan.zhihu.com/p/374903490 | npm是什么、npm的常用命令及如何解决npm被墙的问题 - 知乎 https://www.shuzhiduo.com/A/gAJGY3nndZ/ | 解决NPM无法安装任何包的解决方案(npm ERR! code MODULE_NOT_FOUND)
完成 README.md
添加badge
添加测试badge
![]()
- 使用工作流程文件的名称来引用工作流程
https://github.com/<OWNER>/<REPOSITORY>/actions/workflows/<WORKFLOW_FILE>/badge.svg - Markdown 示例

添加npm badge

- 在shields.io上搜
npm - 添加
codecov badge代码覆盖率Code Coverage - 添加
npm badge
参考
使用命令行git open打开仓库
- 安装
yarn global add git-open - 项目根目录下打开
git open
caniuse查看浏览器支持样式的版本
删除App.vue中的测试代码块
|
|
总结
- 使用
Vue单文件组件 - 打包工具
Parcel - 单元测试
{...} {...} - 自动测试
KarmaBDD风格的Mocha断言库Chaiexpect - 持续集成
GitHub Actions package.json发布npm publishyarn link本地试用包,加快测试效率
在 GitHub 上有一个远程仓库 仓库中有一个 package.json 仓库中有一个 LICENSE 文件 仓库中有一个 README.md 文件 仓库中有一个 index.html 文件
参考文章
- 用于 TDD 的 JavaScript 单元测试工具
- 自动化单元测试
- TypeScript + Jest 开源项目的自动化测试
- 前端单元测试框架-Jest入门配置(测试TypeScript)
- 使用 Vue Cli3 + TypeScript + Vuex + Jest 构建 todoList
- 前端抢饭碗系列之Vue项目中如何做单元测试
- [译] JavaScript 单元测试框架:Jasmine, Mocha, AVA, Tape 和 Jest 的比较
Mocha Chai Chai-spies Karma 单元测试
- Mocha和单元测试
- 【vue系列】vue2.x 项目配置 Mocha 单元测试
- 搭建 vue2 单元测试环境(karma+mocha+webpack3)
- Vue.js学习系列六 —— Vue单元测试Karma+Mocha学习笔记
- vue单元测试Mocha + Chai + Vue-Test-Utils
https://juejin.cn/post/6903690374158974989 | 马上就2021年了,你还不懂怎么在vue做单元测试? https://juejin.cn/post/6844903982922465293 | Vue-Test-Utils + Jest 单元测试入门与实践 https://juejin.cn/post/6844904018129453070 | 单元测试从零开始,包含 Vue 及 React 项目中该如何单测 https://juejin.cn/post/6844903624833761294 | Vue单元测试探索 https://juejin.cn/post/6844903597528842248 | 从零开始做Vue前端架构(6)单元测试 & 代码覆盖率 https://juejin.cn/post/6885953990345883661 | 顺藤摸瓜🍉:用单元测试读懂 vue3 中的 defineComponent https://juejin.cn/post/6844903911539621896 | 使用 Jest 进行 Vue 单元测试 https://juejin.cn/post/6844903794765987854 | 【译】Vue 的小奇技(第九篇):快照测试的威力 https://juejin.cn/post/6844903812885381133 | vue单元测试vue test utils使用初探 https://juejin.cn/post/6844904021778497549 | Vue使用Jest单元测试(学习笔记) https://juejin.cn/post/6844903974512885767 | 尝鲜Vue3之四:如何运行Jest单元测试 https://juejin.cn/post/6844904012827852814 | vue单元测试第一篇:单元测试介绍和基本使用 https://juejin.cn/post/6975686914267414565 | 基于Vue 的单元测试 https://juejin.cn/post/6844903742119084040 | 为vue的项目添加单元测试 https://juejin.cn/post/6844903966879268878 | Vue单元测试 https://juejin.cn/post/6844903886331838472 | Vue组件库工程探索与实践之单元测试 https://juejin.cn/post/6856649733290377224 | 试着为vue项目添加单元测试(一) https://juejin.cn/post/6856730547969622024 | Vue单元测试代码大全( jest + vue-test-utils) https://juejin.cn/post/6844903970008203277 | Vue使用jest单元测试详解 https://zhuanlan.zhihu.com/p/26752090 | Vue 的单元测试探索(一) - 知乎 https://juejin.cn/post/6978831511164289055 | Vue业务系统落地单元测试 https://juejin.cn/post/6844903550057709582 | VUE+jtest的组件单元测试 https://www.jianshu.com/p/45e8c2b26309 | Vue单元测试case写法 - 简书 https://zhuanlan.zhihu.com/p/26796206 | Vue 的单元测试探索(二) - 知乎 https://juejin.cn/post/6844904082516377607 | vue项目搭建jest单元测试及采坑 https://juejin.cn/post/6844904038916423688 | vue单元测试 https://juejin.cn/post/6845166890994647054 | vue 项目增加 Jest 单元测试 https://mp.weixin.qq.com/s/FZhcKXpikOgjKXQwFvbB5A | [译] Vuex 之单元测试 https://juejin.cn/post/6950903896621613069 | Vue单元测试初探 https://juejin.cn/post/6916677772962168845 | VUE单元测试–进阶之路 https://juejin.cn/post/6951195118728642574 | Vue中的单元测试实践 https://juejin.cn/post/6892003555818143752 | 手把手带你入门前端工程化——超详细教程 https://juejin.cn/post/6921869301934882823 | VUE单元测试–终点 https://juejin.cn/post/6906295144505409549 | VUE单元测试–开启测试之旅 https://juejin.cn/post/6844903941650513934 | vue的自动化测试详解 https://juejin.cn/post/6844903966795366407 | UI组件库从1到N开发心得-单元测试篇 https://juejin.cn/post/6844904084106018823 | Vue - 单元测试 https://juejin.cn/post/6844903936038551565 | 使用Jest对Vue进行单元测试 https://juejin.cn/post/6865477717220851720 | 学习Vue应用测试,让你的项目更加健壮和稳定 https://juejin.cn/post/6844904015436709902 | [译] Vue 3 Composition API 之单元测试 https://juejin.cn/post/6844903701778268168 | 基于VUE移动端UI好用框架 https://juejin.cn/post/6844903878077464590 | 单元测试框架Jest https://juejin.cn/post/6854573221744738312 | 使用Jest实现Vue自动化测试 https://juejin.cn/post/6844904057094537229 | Vue 组件单元测试究竟测试什么? https://juejin.cn/post/6844903494042779662 | 前端每周清单第 29 期:Web 现状分析与优化策略、Vue 单元测试、Headless Chrome 爬虫 https://juejin.cn/post/6844904160136003592 | 使用 Karma + Mocha做单元测试 https://juejin.cn/post/6844904053340635143 | toast组件单元测试 https://juejin.cn/post/6844904202062299144 | 基于Vue2.6搭建UI组件库+VuePress搭建文档 https://juejin.cn/post/6844903844401381390 | 单元测试规范 https://zhuanlan.zhihu.com/p/48365663 | Vue 应用单元测试的策略与实践 04 - Vuex 单元测试 - 知乎 https://juejin.cn/post/6844903698431213582 | 实例入门 Vue.js 单元测试
https://juejin.cn/post/6844903885652377614 | 有赞前端质量保障体系 https://juejin.cn/post/6920154021911396359 | 测试工具比较:选Jest,不选Mocha https://juejin.cn/post/6983672477977149448 | jest.useFakeTimers 后,setTimeout 还是宏任务么? https://juejin.cn/post/6974673792748486693 | 前端自动化测试-Jest 快速入门 https://juejin.cn/post/6940890530481963022 | 手摸手带你走入前端单元测试 https://juejin.cn/post/6931301450316251150 | Jest 前端自动化测试基础 (二)异步代码测试 https://juejin.cn/post/6844903630177320973 | 浅谈前端测试 https://juejin.cn/post/6844903831659085837 | 一次学会使用 mocha & jest 编写单元测试 https://juejin.cn/post/6844904009887645709 | JS测试框架Jest/Mocha/Ava的简单比较 https://juejin.cn/post/6844904114753634317 | Jest前端自动化测试入门 https://juejin.cn/post/6844903489030586376 | 前端测试框架 Jest https://juejin.cn/post/6844904194600599560 | 试试前端自动化测试!(基础篇) https://juejin.cn/post/6844903565345980429 | 使用Jest对原生TypeScript 项目进行UI测试 https://juejin.cn/post/6981360058156187661 | 如何使用Jest做单元测试 https://juejin.cn/post/6844903934906089480 | Mocha js官方文档翻译 —— 简单、灵活、有趣 https://juejin.cn/post/6844904127147802632 | 前端单元测试-mocha https://juejin.cn/post/6935246645323890724 | 前端单元测试技术方案总结 https://juejin.cn/post/6844903847874265101 | 面试官(6): 写过『通用前端组件』吗? https://juejin.cn/post/6844904020910276616 | 使用 mocha 进行前端单元测试 https://juejin.cn/post/6844903705712525320 | 前端单元测试之Jest